


When it comes to expressing creativity and style, clay beaded bracelets have become a popular choice for many DIY enthusiasts. These unique and charming accessories can elevate any outfit and make a bold statement. But before we dive into the exciting world of bracelet-making, let's understand the basics of how to make clay beaded bracelets.
As Amazon affiliates we may earn a commission if you purchase a product at no cost to you.
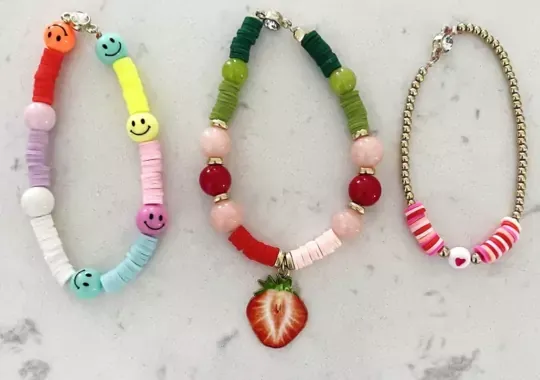
What are Clay Beaded Bracelets?
Clay beaded bracelets are handmade jewelry pieces crafted from various types of clay, which are molded and shaped into beautiful beads. These beads can come in an array of sizes, colors, and patterns, allowing for endless customization options. From elegant and minimalistic designs to quirky and vibrant pieces, clay beaded bracelets cater to every individual's taste and style.
The process of creating these bracelets is an art form in itself. Each bead is carefully shaped, textured, and baked to perfection, ensuring that the final product is not only visually appealing but also durable and long-lasting.
Why Make Your Own Bracelets?
Creating your own clay beaded bracelets brings a plethora of benefits and rewards. Firstly, it allows you to unleash your creativity and produce one-of-a-kind pieces that reflect your personality. You can experiment with different colors, shapes, and techniques, giving you the freedom to craft bracelets that match your wardrobe and moods effortlessly.
Secondly, making your own bracelets is a therapeutic and fulfilling experience. The process of molding the clay and seeing your ideas come to life can be incredibly satisfying. It's a chance to disconnect from the hustle and bustle of daily life, allowing your mind to focus solely on the creative process.
Moreover, crafting clay beaded bracelets can be a fun activity to share with friends and family. Gather around a table with a selection of clay and tools, and you have the perfect recipe for an enjoyable craft night.
Tools and Materials Needed
Before delving into the world of bracelet-making, it's essential to gather all the necessary tools and materials. Here's a list to get you started:
Clay: Choose from a variety of clays such as polymer clay, air-dry clay, or porcelain clay. Each type offers different characteristics, so pick one that suits your preferences.
Rolling Pin: A smooth rolling pin will help you flatten the clay evenly and create uniform beads.
Bead Cutters/Molds: To achieve consistent shapes and sizes, bead cutters or molds are incredibly handy.
Baking Tray and Oven: If you're using polymer clay, you'll need a baking tray and an oven to cure the beads properly.
Paints and Brushes: Acrylic paints and fine brushes can be used to add intricate details and patterns to your beads.
Stringing Material:
Choose from strings, cords, or elastic bands to assemble your bracelet.
Clasps and Findings: Depending on your preferred closure method, gather a selection of clasps and findings.
Pliers: Pliers will come in handy for attaching clasps and making adjustments to your bracelet.
Once you have these tools and materials ready, you're all set to embark on a delightful journey of creating your very own clay beaded bracelets. So, let your imagination run wild, and let your hands bring your unique designs to life!
Choosing the Right Clay
Types of Clay for Bracelet Making
Choosing the right type of clay is crucial for creating stunning and durable clay beaded bracelets. There are several types of clay available, each with its unique properties and characteristics. Understanding the differences between them will help you make an informed decision based on your desired outcomes.
Polymer Clay:
Polymer clay is a popular choice for bracelet making due to its versatility and ease of use. It comes in a range of colors and can be mixed to create custom shades. Polymer clay remains soft until baked, allowing for ample time to work on intricate details and designs. Once baked, it becomes firm and durable, making it ideal for everyday wear.
Air-Dry Clay:
As the name suggests, air-dry clay dries and hardens when exposed to air, eliminating the need for baking. It is an excellent option for beginners or those without access to an oven. However, air-dry clay tends to be more brittle than polymer clay, so it may not be as suitable for bracelets that endure frequent bending.
Porcelain Clay:
As the name suggests, Porcelain clay offers a delicate and refined look, perfect for creating elegant and sophisticated bracelets. It is fired at high temperatures, resulting in a smooth, glass-like finish. While porcelain beads are exquisite, they may be more fragile and require extra care.
Sculpting Clay:
As the name suggests, Sculpting clay is ideal for those who enjoy adding intricate details and textures to their beads. It is a versatile medium that allows for a wide range of sculpting techniques and can be fired in a kiln for a durable finish.
Terracotta Clay:
As the name suggests, Terracotta clay has a natural reddish-brown color and a rustic charm. It is often used for creating boho-inspired or earthy-themed bracelets. Like air-dry clay, terracotta clay does not require baking and is an excellent choice for a more organic look.

Selecting Colors and Combinations
The color palette of your clay beaded bracelet can significantly impact its overall appearance and style. Here are some tips for selecting colors and creating appealing combinations:
Complement Your Wardrobe: Consider the colors of clothing you wear most often. Choose clay colors that complement your wardrobe, allowing your bracelets to effortlessly blend with your outfits.
Contrasting Colors: Experiment with contrasting colors to create eye-catching designs. Colors opposite each other on the color wheel, such as blue and orange or green and red, can create a striking visual impact.
Monochromatic Elegance: For a chic and sophisticated look, stick to a monochromatic color scheme. Use different shades of the same color to add depth and interest to your bracelet.
Patterns and Accents: Mix and match solid-colored beads with patterned ones to add variety and visual interest to your bracelet. Consider using metallic or glittery clay for accents that catch the light.
Nature-Inspired: Draw inspiration from nature's color palette. Earthy tones, pastels, or vibrant floral colors can all be used to create nature-inspired bracelets.
Remember, the beauty of making your own clay beaded bracelets is that you can experiment and let your creativity guide you. Don't be afraid to try new color combinations and clay types to craft truly unique and personalized bracelets that showcase your style and personality.
Preparing the Workspace
Setting Up a Craft Area
Having a well-organized and dedicated craft area is essential for an enjoyable and efficient clay beaded bracelet making experience. Here are some steps to set up your craft area:
Choose a Suitable Space: Select a well-lit and well-ventilated area in your home for your craft space. Natural light is ideal for accurately assessing colors and details in your beads.
Cover and Protect Surfaces: Cover your workspace with a large tablecloth or craft mat to protect the surface from clay residue and accidental spills. This will make cleanup much easier.
Comfortable Seating: Ensure you have a comfortable chair with good back support to prevent discomfort during extended crafting sessions.
Proximity to Tools and Supplies: Arrange your craft area so that all your tools and supplies are within easy reach. This will save time and make the creative process smoother.
Keep it Kid and Pet-Friendly: If you have curious kids or pets, consider setting up your craft area in a space where they can observe safely or providing a barrier to keep them at a distance from the materials.
Inspiring Décor: Personalize your craft area with decorations that inspire your creativity. Hang up artwork, inspirational quotes, or images of beautiful bracelets for motivation.
Organizing Supplies for Efficiency
An organized supply setup will streamline your bracelet-making process and prevent frustration when searching for materials. Consider these tips for efficient organization:
Storage Containers: Invest in clear storage containers with dividers or separate compartments. They allow you to categorize and see your materials easily.
Labeling: Label each storage container or compartment with the name of the materials it holds. This will make it quick to find what you need.
Tool Storage: Use a tool caddy or a dedicated toolbox to keep your tools organized and accessible. This will prevent them from getting lost or scattered around.
Separate Clay by Color: If you have a variety of clay colors, store them separately, preferably in airtight containers, to maintain their freshness and prevent colors from mixing.
Create a Workstation: Designate specific areas for rolling, shaping, and baking your clay beads. This will help keep your workspace neat and prevent cross-contamination between different clay colors.
Sort Beads and Spacers: Sort your completed clay beads and spacers by size, shape, and color. This will make it easier to find the right components when designing your bracelet.
Keep a Checklist: Create a checklist of essential supplies and materials, and ensure you have everything you need before starting a project. This will save time and avoid interruptions during crafting.
By taking the time to set up a functional and well-organized craft area, you'll create a conducive environment for creativity to flourish. An efficient workspace will enable you to focus on the enjoyable process of making clay beaded bracelets without the distractions of searching for supplies. Happy crafting!
Creating Clay Beads
Creating uniform clay beads is essential for a polished and professional-looking bracelet. Here are some rolling techniques to achieve consistency in your bead shapes:
Pinch and Roll: Take a small piece of clay and roll it between your palms to create a smooth ball. Place the ball on your work surface and use your thumb and forefinger to pinch and roll it gently back and forth. Gradually apply more pressure to the center of the bead while keeping the ends rounded. This technique helps avoid flat spots and ensures even distribution of clay.
Clay Rollers: Use clay rollers or dowels to roll out a thin, even slab of clay. Use a sharp blade or a clay cutter to create long strips of equal width. Cut these strips into small pieces and roll them into beads. Clay rollers provide a consistent thickness and shape for your beads.
Bead Rollers: Invest in bead rollers, which are specialized tools designed to create perfectly shaped beads. Choose a bead roller with the desired bead size and shape, place a small amount of clay in the cavity, and roll it between your hands to achieve a uniform bead.
Calibrated Slats: Create calibrated slats by rolling out a sheet of clay and cutting it into precise strips of equal width. Use these slats as guides to shape your beads, ensuring they are all the same size.
Digital Calipers: If you want absolute precision, use digital calipers to measure the diameter of each bead. Adjust the size by gently compressing or expanding the clay until you achieve the desired measurement.
Using Molds for Intricate Designs
Molds offer an easy way to create intricate and detailed designs for your clay beads. Here's how to use molds effectively:
Selecting Molds: Choose molds that complement your bracelet design. There are various options available, from simple geometric shapes to more elaborate floral or abstract patterns.
Preparation: Before using the mold, apply a thin layer of mold release agent or cornstarch to prevent the clay from sticking. This will make it easier to remove the beads from the mold without damaging the details.
Pressing the Clay: Take a small amount of clay and press it gently into the mold cavity, ensuring it fills all the intricate details. Use your fingers or a clay roller to smooth the surface and remove any excess clay.
Demolding: Carefully remove the bead from the mold by gently flexing the mold or using a toothpick to push the bead out from the backside. Be patient and gentle to avoid distorting the design.
Combining Molded Beads: Mix and match molded beads with other handmade beads to create a diverse and visually appealing bracelet design.
Adding Texture and Patterns
Adding texture and patterns to your clay beads can elevate the visual appeal of your bracelet. Here are some techniques to consider:
Textured Stamps: Use textured stamps or found objects like leaves, fabric, or lace to impress patterns onto the surface of the clay beads. Roll the bead over the stamp to transfer the texture.
Carving Tools: Experiment with carving tools to create intricate designs directly on the surface of the clay. This technique works well with soft clay and can add depth and character to your beads.
Incorporating Canes: Polymer clay canes are thin, multicolored clay rods with intricate patterns inside. Slice thin sections from the cane and apply them to the surface of your beads for a mesmerizing effect.
Inking and Painting: After baking the beads, use acrylic paint or ink to add colors and details to the textured surface. Wipe off excess paint to highlight the raised areas and create a beautiful contrast.
Mica Powders: Brush mica powders onto the surface of the beads to add a shimmering metallic effect.
Experiment with different rolling techniques, molds, textures, and patterns to create a diverse collection of clay beads for your bracelet. The more you explore and innovate, the more unique and captivating your bracelet design will be. Enjoy the creative journey!
Sanding and Polishing the Bracelet
Sanding and polishing your clay beaded bracelet add the perfect finishing touches, resulting in a smooth and professional appearance. Here's how to achieve a polished finish:
Sandpaper Selection: Use fine-grit sandpaper (around 400 to 600 grit) to sand the surface of your clay beads gently. Sand in a circular motion, focusing on any rough edges or imperfections.
Smooth the Beads: Sand each bead until it feels smooth to the touch. Pay attention to the sides and edges to ensure a consistent finish.
Wet Sanding: For a more refined and glossy finish, try wet sanding. Dampen the sandpaper with water and continue sanding the beads. Wet sanding helps reduce dust and provides a smoother surface.
Buffing Wheel: If you have a buffing wheel or polishing machine, you can use it to achieve a high-gloss shine on your beads. This step is optional but adds a professional touch.
Clean the Beads: After sanding and polishing, wipe the beads clean with a soft, damp cloth to remove any residue.
Applying a Protective Sealant
To enhance the durability and protect the finish of your clay beaded bracelet, applying a sealant is a wise step. Here's how to do it:
Sealant Selection: Choose an appropriate sealant based on the type of clay you used. For polymer clay, use a polymer clay-specific varnish or glaze. For air-dry clay, opt for a clear acrylic sealer.
Brush-On Application: Use a soft brush to apply a thin and even layer of the sealant to the entire surface of the beads. Ensure the sealant covers all areas, including crevices and textures.
Drying Time: Allow the sealant to dry completely as per the manufacturer's instructions. Avoid touching the beads during this time to prevent fingerprints or smudges.
Additional Coats: Depending on the sealant's instructions, you may need to apply multiple coats for added protection. Ensure each layer dries completely before applying the next.
Tips for Bracelet Maintenance and Storage
Proper maintenance and storage will prolong the life and beauty of your clay beaded bracelet. Here are some tips:
Avoid Excessive Moisture: While most sealants offer some water resistance, it's best to avoid immersing your bracelet in water or wearing it while swimming or bathing.
Remove Before Physical Activities: Take off your bracelet before engaging in vigorous activities or exercises to prevent potential damage.
Keep Away from Heat: Avoid exposing your bracelet to direct sunlight, extreme heat, or open flames, as excessive heat can deform or melt the clay.
Avoid Chemicals: Avoid contact with harsh chemicals, perfumes, or cleaning agents, as they may damage the finish or discolor the beads.
Clean Gently: If your bracelet becomes dirty, clean it with a soft, damp cloth. Avoid using abrasive materials or harsh chemicals for cleaning.
Separate Storage:
Store your bracelet separately from other jewelry to prevent scratches and tangling. Use jewelry boxes, pouches, or soft fabric-lined containers for safekeeping.
Recommended Article
 Charlie Mills
Frequently Asked Questions FAQs
How to make clay beaded bracelets?
To make clay beaded bracelets, you'll need clay, rolling tools, molds (optional), and a baking tray. Follow our step-by-step guide on creating unique and stylish clay beaded bracelets from start to finish.
Can I mix clay beads with other materials for my bracelets?
Absolutely! Mixing clay beads with gemstones, crystals, metal spacers, or leather cord can add an intriguing dimension to your bracelet designs, making them even more eye-catching.
How can I ensure the durability of my clay beaded bracelets?
Ensuring the durability of your clay beaded bracelets involves proper baking and curing, selecting the right stringing material, and applying a protective sealant. Additionally, following our care and storage tips will help maintain the bracelet's beauty and longevity.
Conclusion
Learn how to make clay beaded bracelets. Creating your own clay beaded bracelets is a rewarding and enjoyable craft that allows you to express your creativity and style. Understanding the different types of clay, rolling techniques, and design elements are essential for crafting unique and personalized bracelets. Each bracelet you create will be a wearable piece of art that reflects your personality and brings joy to those who wear them or receive them as treasured gifts. Happy crafting and bracelet making!


